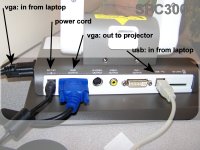
 If you have the new SPC300 visualizer (document imaging camera) by Avermedia, here is a diagram that you can use for setting up the cables. When the visualizer is set up this way, you can switch between your computer and the visualizer by using the buttons on the visualizer. Press camera to project the visualizer. Press source to project the computer. Set up this way you can leave your projector alone. This is especially helpful if you have a projector mounted on the ceiling. diagram_spc300.jpg ( TO PRINT: Save picture to desktop. Go to desktop. Double-Click on image. When “Windows Picture and Fax Viewer” opens up, click on the print icon below.) This will ensure that the picture is resized so that it fits on a single sheet of paper.
District Software
- 2024-25 Calendar
- Assessment Calendar (TSD)
- Alpine Achieve
- BrainPOP
- Frontline: Absence & Time | Professional Growth
- FAST
- HELP desk
- Library | Lisa’s Site
- Make a Media Plan for Screentime
- PARCC Login for Teachers
- Power Source (tutorials)
- PowerAdmin
- Power Teacher
- SAMR Model
- RANDA
- Schoology (Telluride Login)
- Telluride Education Association (TEA)
- WeR1 | Amazon
Log-In Assistance
Presentations
- Apple Classroom
- Aspire Launch
- Casper Focus
- CMAS & PARCC Launch
- EOY Tech Round-up
- EOY: Schoology
- FAST Launch
- FrontLine: Professional Growth
- iPad Misuse Consequences
- iPads & What Students Should Know
- PARCC Tutorials
- Pages >>> Schoology
- PowerSchool: Report Card Interface
- Printing
- Printing Schoology Progress Reports
- Quizlet (Getting Started)
- RANDA Launch
- Schoology: Gradebook Setup
- Schoology: Email Digest
- Schoology: Linking Courses
Parent Outreach
GeoBee Resources
Mathematics Resources
Typing


