Category Archives: Technology Operations & Concepts

3… Save your work!

Teachers,

The end of the year is quickly approaching. It’s time to consider saving your work in Schoology. By this I mean, ALL of the resource links, files, assignments, quizzes, etc. this year for next year. You have 3 options:

  1. Save the entire course! (Easy)
  2. Save individual materials or folders. (Proactive)
  3. Save nothing and hope that the course archived and you can root around for the work you didn’t save. (Challenging)

Below y0u’ll find direction on how to save your courses and individual materials/folders. If you would like support with any part of this process, please let me know.


What if you have already built content in your course or at the end of the semester/year you want to save your entire course to resources so you can begin to edit for next year (or save for future years), the steps below will help you save your materials. Throughout the Resources module you have seen that resources let you share, save, and copy materials easily to courses, which means the more you work in your Resources the easier it is to create course content.

Save an Entire course to Personal Resources:
(Video on Saving Course) ~ hat tip to James Taschek for this.

  1. The first step would be to create a collection with the course name in personal resources
  2. Then go to the course to save
  3. Click Options
  4. Click Save Course to Resources
  5. Note: The copying-job may take a few hours.
  6. Select the Collection and/or Folder
  7. Click Submit


Save Individual Materials or Folders:

  1. Go to the course to save materials
  2. Click the “Gear” beside the content to copy
  3. Click Save to Resources
  4. Select the Collection and/or Folder to copy to
  5. Click Save Copy
  6. Note: The copying-job may take a few hours.

4… Save Your Work!

Teachers,

The end of the year is quickly approaching. It’s time to consider saving your work in Schoology. By this I mean, ALL of the resource links, files, assignments, quizzes, etc. this year for next year. You have 3 options:

  1. Save the entire course! (Easy)
  2. Save individual materials or folders. (Proactive)
  3. Save nothing and hope that the course archived and you can root around for the work you didn’t save. (Challenging)

Below y0u’ll find direction on how to save your courses and individual materials/folders. If you would like support with any part of this process, please let me know.


What if you have already built content in your course or at the end of the semester/year you want to save your entire course to resources so you can begin to edit for next year (or save for future years), the steps below will help you save your materials.   Throughout the Resources module you have seen that resources let you share, save, and copy materials easily to courses, which means the more you work in your Resources the easier it is to create course content.

Save an Entire course to Personal Resources:
(Video on Saving Course) ~ hat tip to James Taschek for this.

  1. The first step would be to create a collection with the course name in personal resources
  2. Then go to the course to save
  3. Click Options
  4. Click Save Course to Resources
  5. Note: The copying-job may take a few hours.
  6. Select the Collection and/or Folder
  7. Click Submit


Save Individual Materials or Folders:

  1. Go to the course to save materials
  2. Click the “Gear” beside the content to copy
  3. Click Save to Resources
  4. Select the Collection and/or Folder to copy to
  5. Click Save Copy
  6. Note: The copying-job may take a few hours.

Schoology Login for Students

Parent Schoology Guide LINK

Note: Schoology Enterprise requires students to log in with their usernames only. For example cearthtree (NOT cearthtree@telluride.k12.co.us). This is true when logging in to the Schoology iPad application AND on a browser (Safari, Chrome, Firefox, etc).

HOW TO LOG IN TO BROWSER

  1. Open Browser of Choice
  2. Go to the address: www.telluride.schoology.com (bookmarked on earthtree.org)
  3. Type in username: (for example cearthtree)
  4. Type in password: ************** (Same as Apple ID password)

Image-1HOW TO LOG IN TO iPad APPLICATION

  1. Open application
  2. Tap on “Username Login”
  3. Type in username: (for example cearthtree)
  4. Type in password: ************** (Same as Apple ID password)

Parent Schoology Guide LINK

Revolutionary War Projects

Ms. Cyndi’s Class

Mrs. Starr’s Class

Mrs. York’s Class

Mrs. Wolfe’s Class

Exporting Movie from iMovie | Uploading to DropItTo.Me

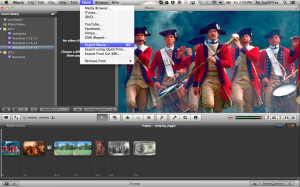
5th Grade students are working on creating multimedia presentations of their studies of the American Revolutionary War. Here is a quick tutorial on how to first export the work from iMovie to the desktop as a video file and then to upload it to dropitto.me/earthtreec in order to share it with me.

First, in iMovie click on “Share” and then “Export Movie.”
Screen Shot 2013-05-24 at 2.59.02 PM


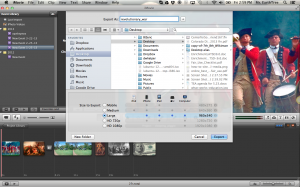
Next, NAME IT, (MAKE SURE THAT YOUR NAME AND YOUR TEACHERS NAME IS INCLUDED IN THE MOVIE NAME) select “Desktop” and then “Export.”
Screen Shot 2013-05-24 at 2.59.24 PMNow that you have a video file on the desktop, go to www.DropItTo.Me/EarthTreeC.
Screen Shot 2013-05-24 at 3.00.26 PM

Type in the password (my last name) and then browse to the desktop and double-click on the file you want to upload.

Then click “UPLOAD.”

Screen Shot 2013-05-24 at 3.00.34 PM

WAIT UNTIL YOU SEE A NOTE DISPLAYED THAT SAYS “FILE SUCCESSFULLY UPLOADED” BEFORE YOU CLOSE THE BROWSER!!!
Screen Shot 2013-05-24 at 3.13.55 PM

Once all of the videos are uploaded, I’ll burn them to a DVD for each class.