District Software
- 2024-25 Calendar
- Assessment Calendar (TSD)
- Alpine Achieve
- BrainPOP
- Frontline: Absence & Time | Professional Growth
- FAST
- HELP desk
- Library | Lisa’s Site
- Make a Media Plan for Screentime
- PARCC Login for Teachers
- Power Source (tutorials)
- PowerAdmin
- Power Teacher
- SAMR Model
- RANDA
- Schoology (Telluride Login)
- Telluride Education Association (TEA)
- WeR1 | Amazon
Log-In Assistance
Presentations
- Apple Classroom
- Aspire Launch
- Casper Focus
- CMAS & PARCC Launch
- EOY Tech Round-up
- EOY: Schoology
- FAST Launch
- FrontLine: Professional Growth
- iPad Misuse Consequences
- iPads & What Students Should Know
- PARCC Tutorials
- Pages >>> Schoology
- PowerSchool: Report Card Interface
- Printing
- Printing Schoology Progress Reports
- Quizlet (Getting Started)
- RANDA Launch
- Schoology: Gradebook Setup
- Schoology: Email Digest
- Schoology: Linking Courses
Parent Outreach
GeoBee Resources
Mathematics Resources
Typing
Category Archives: Uncategorized
Visualizer Presentation notes
Comments Off on Visualizer Presentation notes
Posted in Uncategorized
Fuzzy Visualizer with a Clean Lens
Today I was using a visualizer and it was soooooo fuzzy. I just couldn’t get it to focus. Then I noticed one little cable curving its way in and then out of the visualizer’s view… that was it. Once I moved it out of the way and pressed AF (auto focus) again, it worked!
If you do get a fuzzy visualizer and that doesn’t work, check the cables. Press each cable in place on the visualizer, computer and projector.
Finally unplug the power from the base and then plug it in again. That should do it. Right?
Comments Off on Fuzzy Visualizer with a Clean Lens
Posted in Uncategorized
Mathematics Center
Here’s a site that contains worksheets that give immediate feedback to students. This could be used in an interactive way. Students can demonstrate to the class how to solve problems. Using a promethean board, split the screen so that one side shows the website and the other side has a blank flipchart. Students can use the blank flipchart to demonstrate how to solve the problem and then check their answers immediately for instant feed back. Using the camera tool, the screen can be captured for later use.
Comments Off on Mathematics Center
Posted in Uncategorized
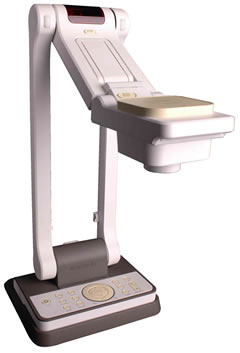
the SPC300 visualizer
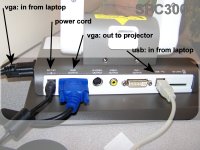
If you have the new SPC300 visualizer (document imaging camera) by Avermedia, here is a diagram that you can use for setting up the cables. When the visualizer is set up this way, you can switch between your computer and the visualizer by using the buttons on the visualizer. Press camera to project the visualizer. Press source to project the computer. Set up this way you can leave your projector alone. This is especially helpful if you have a projector mounted on the ceiling. diagram_spc300.jpg ( TO PRINT: Save picture to desktop. Go to desktop. Double-Click on image. When “Windows Picture and Fax Viewer” opens up, click on the print icon below.) This will ensure that the picture is resized so that it fits on a single sheet of paper.
Comments Off on the SPC300 visualizer
Posted in Uncategorized
Student Centers – 5 Minute Makeovers
Before break, I was talking to a teacher that was frustrated with her computer center. The students would go to the computer during centers time and then would go immediately back to her to ask which icon they need to click on. No matter whether she showed them on the projector, used sticky notes, or elaborate directions, a large portion of students needed more assistance when it was time to begin their activity. Icons can be confusing to students. Icons are small and many have similar graphics.So… here are four things you can do to make your computer more student-friendly for centers. Give your student computers a “5 Minute Makeover.” – use purposeful wallpaper – delete (or folder) extra icons – increase the font size– make One Place the home page for explorerThese wallpapers were created to make centers easier for students to comprehend which resource they should access first, or which resources they can choose from. If you see wallpaper that works for you, click on it, then right-click on the image and “set as wallpaper.” Also, feel free to download an image and edit it to meet your needs.This wallpaper will be much more useful if the majority of shortcuts and desktop icons are deleted. This will make it very obvious to students where they should begin. Have only the icons students should be accessing that day/week on the desktop. If you aren’t comfortable deleting the icons, just make a new folder and slip them into it. If the icons are snapping to the grid and aren’t lining up the way you’d like, you can turn the function off. Just right-click on the desktop, click on ” Arrange Icons by” and then uncheck “snap to grid.”Another great way to make the computer more student-friendly is to increase the font size on the computer (Thanks Kim!). You can do that by right-clicking on the desktop, choosing “properties,” clicking on the “appearance” tab and adjusting the font size.Finally, make One Place the home page for Internet Explorer. All of the online resources that they will need to access can be found on this page. To set it as the home page, do this. Open Internet Explorer, click on “Internet Options,” and the “General” tab. Type in http://discovery.aps.k12.co.us into the box. All set, click, “ok.”In just 5 minutes you can turn your classroom student computers into fun and focused centers.
Comments Off on Student Centers – 5 Minute Makeovers
Posted in Uncategorized